If you’re having issues with your toilet float, knowing how to adjust it can help solve common toilet tank problems and prevent water wastage. The toilet float is an important part that controls the water level in the tank. By adjusting the float, you can ensure proper flushing and avoid constant running. Different types of floats require different adjustment methods, such as using a screwdriver or a spring clip. Learning how to adjust the toilet float is a simple task that can save you time and money on professional repairs.
Toilet Parts and Tools

- Toilet tank:
This is the container where water is stored, waiting to be released during a flush. It’s typically made of porcelain and sits directly behind the toilet seat.
Fill valve:
- This is the mechanism that refills the tank after a flush. It’s activated by the flush lever and stops once the tank is full. It’s crucial to ensure it’s working correctly to prevent overflows and under-fills. source
Float ball:
- This is a floating device, usually made of plastic, that rises with the water level in the tank. It’s connected to the fill valve and signals it to shut off once the water reaches a certain level.
Toilet flapper:

- This rubber flap covers the passage from the tank to the toilet bowl. When you flush, the flapper lifts, allowing water to enter the bowl. It then reseals, ensuring the tank can refill.
Screwdriver:
- A common tool used to adjust the fill valve, especially in modern toilets where a screw determines the float ball’s height.
Understanding Fill Valve Mechanism
The fill valve mechanism in a toilet controls the water level in the tank. Understanding how it works can help you troubleshoot and adjust any issues with your toilet’s water level.
Water intake:
- This is the process where the tank refills with water after a flush. It’s crucial for this to be efficient to ensure the toilet is ready for the next use.
Float mechanism:
- This system ensures the fill valve knows when to shut off. As the water level rises, so does the float. Once it reaches a predetermined height, it signals the fill valve to stop.
Overflow tube:
- This is a safety feature. If the fill valve malfunctions and doesn’t shut off, the overflow tube ensures the excess water has a place to go, preventing floods.
Valve shutoff:
- This is the mechanism that stops the water flow once the tank is full. It’s typically a part of the fill valve and is activated by the float mechanism.
Refill process:
- After flushing, the tank needs to refill. This process involves the fill valve taking in water, the float rising, and the valve shutting off once full.
Symptoms of Maladjustment

To identify symptoms of maladjustment in your toilet’s fill valve, pay attention to signs like
Running toilet:
- This is when water continuously flows from the tank to the bowl. It’s often due to a malfunctioning flapper or an improperly adjusted fill valve.
Incomplete flush:
- This happens when there’s not enough water in the tank to complete a flush. It can be due to a misadjusted float that stops the fill valve prematurely.
Overflowing water:
- If water spills out of the tank, it’s a sign the fill valve didn’t shut off in time. This can be due to a malfunctioning float mechanism.
Weak flush:
- If the water doesn’t flow into the bowl with enough force, it can be due to a low water level in the tank or blockages in the flush passages.
Water wastage:
- If the toilet is using more water than necessary, it can be due to a fill valve that fills the tank too much or a flapper that doesn’t seal properly.
Fill Valve Adjustment Techniques
Adjusting a toilet float can be done using different techniques depending on the type of fill valve.
Adjusting the Float Cup in Toilet Fill Valve:
- Modern toilets often use a float cup instead of a ball. To adjust, pinch the clip on the rod and slide the cup up to increase water level or down to decrease. source
Techniques for Arm-Based Fill Valve Adjustment:
- For toilets with a float ball, the adjustment is made by bending the rod (for older models) or turning an adjustment screw. This changes the height at which the float signals the fill valve to shut off.
Methods for Pinch-Clamp Fill Valve Adjustment:
- Some modern toilets use a pinch-clamp for adjustment. By pinching the clamp, you can slide the float up or down the fill valve rod, adjusting the water level in the tank.
Setting the Water Level in the Toilet Tank:
- After making adjustments, ensure the water level is about 1-1.5 inches below the overflow tube’s top. This ensures efficient flushes without wasting water.
Procedures for Testing the Toilet Flush Efficiency:
- After adjusting, always test by flushing multiple times. Ensure the bowl refills adequately and the tank stops filling at the correct level.
Types of Fill Valves
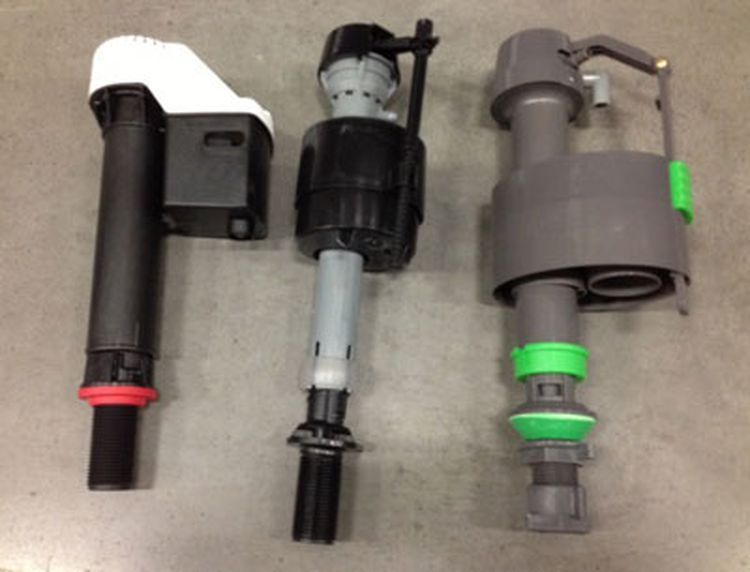
There are different types of fill valves that you should be aware of when adjusting your toilet float. Let’s explore them.
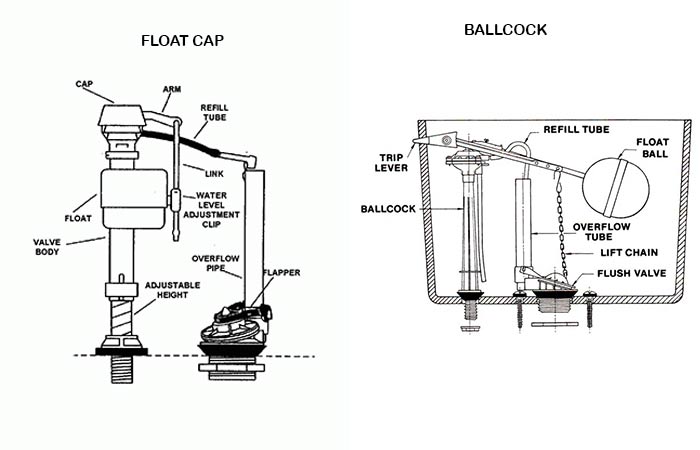
Ballcock:
- The traditional fill valve mechanism, often found in older toilets. It uses a float ball and rod system.
Diaphragm-type:
- This fill valve uses a diaphragm to control water flow. It’s more modern than the ballcock but less common than the float cup.
Float cup:
- This is the most common type in modern toilets. It uses a cylindrical float that slides up and down a rod.
Floatless:
- This type uses pressure sensors to determine when the tank is full. It’s less common and can be more expensive.
Plunger-type:
- This older design uses a plunger mechanism to control water flow. It’s less common in modern toilets.
Fill Valve Issues
If you’re experiencing issues with your toilet fill valve, troubleshooting the problem can help you identify and fix the issue. Here are some common issues.
Silent leaks:
- These are leaks that aren’t immediately noticeable. They can be due to a malfunctioning flapper or fill valve.
Slow refill:
- If the tank takes a long time to refill, it can be due to blockages or a malfunctioning fill valve.
Noisy tank:
- If there are loud noises during the refill process, it can be due to high water pressure or air in the lines.
Constant water flow:
- If water keeps flowing even after the tank is full, it’s a sign of a malfunctioning fill valve or float.
Broken parts:
- If any part of the fill valve mechanism is broken, it will need to be replaced.
Fill Valve Replacement Guide

To replace the fill valve in your toilet, you’ll need to gather the necessary tools and follow these step-by-step instructions.
Choosing the right valve:
- Ensure you choose a valve compatible with your toilet model. There are many types available, so consult your toilet’s manual or a plumbing expert.
Removal of old valve:
- Turn off the water supply, flush the toilet to drain the tank, and then remove the old valve by unscrewing it from the base.
Installing new valve:
- Follow the manufacturer’s instructions. Typically, you’ll screw the new valve into place, connect the water supply, and then adjust the float.
Checking connections:
- Ensure all connections are tight and there are no leaks.
Ensuring optimal operation:
- After installation, test the flush multiple times to ensure everything works correctly.
Conclusion
In conclusion, if your faucet keeps running after you turn it off, there may be an issue with the fill valve mechanism. Understanding how to adjust this component can save you time and money on professional repairs, while also reducing water bills and allowing for a customized water level. Interestingly, did you know that a leaky faucet can waste up to 3,000 gallons of water per year? By addressing this issue promptly, you can help conserve our precious water resources. Remember to refer to troubleshooting guides or consider replacing the fill valve if necessary.
FAQ
- How much does it cost to replace a fill valve?
- Costs can vary based on region, type of valve, and whether you hire a professional. On average, a fill valve itself can cost between $10-$50, with professional installation adding to the cost.
- Can I do the adjustment myself or should I hire a professional?
- Many adjustments can be made by homeowners using guides or instructional videos. However, for replacements or if you’re unsure, hiring a professional is recommended.